When Is Gold Saucer Open Again
This is the battle arena. Show me your fighting skills. Just yous, my boy, I'm expecting a practiced fight!
Dio
The Battle Square, also known equally battle arena, or the Colosseum, is a department of the Gold Saucer in Final Fantasy VII. It is a battle arena where the player selects a unmarried grapheme and fights in a gauntlet-fashion friction match, facing eight enemies in a row to earn points to exchange for prizes.
The Battle Square is offset visited in "Sanctuary of Amusement" afterwards Cait Sith joins, when the political party meets Dio, but its battles are not open to the histrion. They get available following "The Desert Prison", afterward the player acquires the buggy. The player must participate in one mandatory battle in "Secret Date", Dio tells the party he'll requite them the Keystone if Cloud agrees to "entertain" him. Subsequently Falling star is summoned, when Cloud rejoins the party, the Battle Square is open once over again with a diversity of very valuable prizes. Cloud also may become eligible for a special round at the loonshit.
Starting a battle at the Boxing Foursquare earns the Battle Foursquare achievement in the PC version re-release of Final Fantasy VII.
Layout [ ]
Overview [ ]
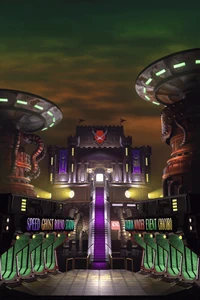
The Boxing Square is ane of the eight zones in the Gold Saucer, and the 5th from the left from the Gold Saucer'south entrance. It is accessible from all zones. The role player enters the Battle Square from its archway.
The Boxing Square is divided into various locations. The main attraction is the loonshit accessed during battles, and the player will otherwise spend their time in the loonshit foyer. The Boxing Square houses Dio's museum, a exhibit off to the side of the lobby. A secluded area beyond the lobby is a room where prisoners can be trapped and thrown into the Corel Prison.
Entrance [ ]
Entrance.
The Archway ("Battle Square" in the carte) is the first location of Battle Square and the only way to access it. It has viii doorways leading to the other areas of the theme park, each titled above with the Boxing Square'south name in a unique colour. A doorway to the Gilt Saucer entrance appears on either side.
A regal-carpeted stairway leads to the Square's allure. From the exterior it appears like a castle, a drape on purple fabric depicting a sword and shield on either side. Beneath the drapes lights polish a ray of yellowish and royal into the sky. The door leads into the loonshit foyer. In the center above the entrance is a shield symbol with ii-crossed swords.
On the actor's start visit to the Battle Foursquare a male staff will foreclose them from climbing the stairs, citing renovations. When the player returns afterward recruiting Cait Sith from the Wonder Foursquare, they volition discover a falling guard and Deject volition encounter the lobby. When the player returns later, a man will tell of the curator's collection displayed at the arena, but he volition no longer be hither later the Northern Cave events at the offset of Part 2.
A woman standing next to the long stairs can be constitute here on the player's return. Speaking to her (she appears just afterwards the party was jailed), selecting "That's the idea", then chirapsia the eighth circular at the arena and speaking to her once more, earns Dart Shoes. Beating either the Special Friction match or the regular match counts. If one chooses "Not interested", even after winning eight consecutive battles, she'll disappear, and the player won't get the accessory. She only gives the accompaniment one time.
Whenever the actor enters the entrance their BP will become 0, meaning every time the player exits the lobby they will lose their accumulated points.
Arena Anteroom [ ]
The Arena Lobby (闘技場ロビー, Tōgijō Robī ?) is where the thespian tin can sign up for battles and earn rewards. To the left and right of the archway are machines where the player can spend accumulated BP on prizes. A man continuing by the car on the right will explain the Battle Square, but only once. At the back of the room in the corners are two help desks whose staff allow players to sign-up for matches.
In the middle at the dorsum and up some stairs is a door into the arena. To a higher place the door is a sign with a skull and the word "CHALLENGER". On the left and right are blue drapes with the symbol of the sword and shield like the ones at the entrance. A imperial carpet runs downwards the centre of the room. On the correct mitt side is a doorway with the sign "DIOs SHOW ROOM" leading to Dio's Museum.
The first time the player is hither a number of gunned-down Shinra infantrymen will lie on the floor, and Dio and security apprehend the player political party. The party will then run on into the arena.
Dio'southward Museum [ ]
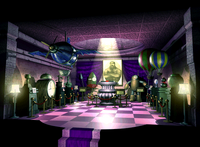
Dio's Museum.
Dio's Museum (ディオの展示場, Dio no Tenjijō ?), also known as Dio's Show Room, tin be entered from the arena anteroom. The area is bordered with Dio's prized possessions. At the back of the room is a portrait of Dio, while the center-piece remains empty for a portion of the game, otherwise containing the Keystone.
The player must enter this surface area after obtaining the Tiny Bronco to have the Keystone. Dio asks Deject to enter the arena, merely the player earns the Keystone regardless if they escape, are defeated, or if they succeed in all viii battles. The actor earns no BP from the battles, but if they win all eight, Dio awards the histrion with a Protect Belong and a Choco Feather.
")
Star Cup (星杯, Hoshi Hai ?)

Weekend Clock (週末の時計, Shūmatsu no Tokei ?)

(プロペラ飛行機, Puropera Hikouki ?)
")
Express joy Sapling (笑うなえぎ, Warau Naegi ?)
")
Slayer's Pot (スレイヤーのつぼ, Sureiyā no Tsubo ?)

Chisa's Mask (チサのカメン, Chisa no Kamen ?)
")
Dio's Portrait (ディオ画, Dio Ga ?)
")
D Blazon Equipment (Dガタ装備, D Gata Sōbi ?)
")
Hot Air Airship (熱気球, Netsukikyuu ?)
")
Zauger'due south Loving cup (ゾウゲの杯, Zouge no Hai ?)

Calling Gourd (呼びかけるひょうたん, Yobikakeru Hyōtan ?)
")
Kleine's Pot (クラインのつぼ, Kurain no Tsubo ?)
")
Keystone (キーストーン, Kīsutōn ?)
Loonshit [ ]
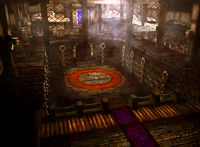
Boxing arena.
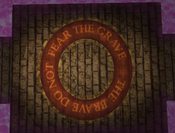
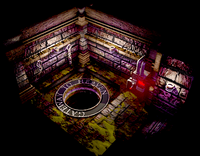
The Loonshit (闘技場, Tōgijō ?) is an area visited but briefly. In the center of the location is where the fights occur. The arena is down a flight of stairs, and has a walkway around it and a moat of purple water. In the center a phrase is written on the circumvolve surrounding the loonshit: "The brave practice non fright the grave." At the back of the arena is an entrance to the Gateway to Heaven room.
The Boxing Foursquare floor.
The arena is entered when the histrion chooses to fight at the Battle Square, and starts with the player running into the loonshit and preparing for battle before the bodily battle begins. The player is chased into the expanse during the story where they are surrounded by security robots that accept the party into the Gateway to Sky.
Although the histrion can never control the graphic symbol in this room, exits are withal programmed. This is prove that the Gateway to Heaven room is backside the arena, which is otherwise just transitioned exercise past fading to black from the arena.
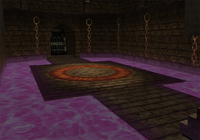
Gateway to Sky [ ]
Gateway to Heaven.
The Gateway to Heaven is a slime-covered stone room behind the arena. In the center is a round trapdoor with the text "GATEWAY TO HEAVEN" around information technology. The door is operated by a machine in the corner. This gate is used to bring monsters for battle, the chains on the wall are used to restrain them.
The area is visited when Deject and his agile party are arrested by Dio. The security robots grab the prisoners and jump downwards the gate into Corel Prison.
Arena minigame [ ]
Rules [ ]
Battle on the Battle Square.
You fight here and collect battle points. You lot can then exchange those points for prizes.
NPC
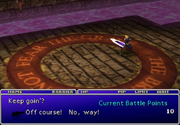
The player pays x GP to participate. The thespian must kickoff select a party fellow member to fight with, who is then sent into the arena. They fight a battle, subsequently which they see how many Battle Points they have accumulated, and are allowed to choose to keep or quit. If they continue on, a slot reel appears and spins, giving the histrion a handicap based on the event. The player continues fighting until they either quit, win all eight matches, or are defeated.
If the player loses, they receive a worthless alleviation prize. If they quit or win, they receive Battle Points (BP). BP tin can be exchanged for items (see below) at the Battle Square, including Cloud'due south ultimate Limit Break manual, Omnislash. BP is reset when the player leaves the Battle Foursquare, so players should attempt to expend all points before exiting.
Withal the player enters the Battle Square, is how they get out the Battle Square. HP and MP return to the values as earlier entering, and if i were to go in with a full Limit Break bar, i would exit the Battle Square with a full Limit Break bar, regardless of whether they used a Limit in the boxing. Condition furnishings that one enters the Battle Square with remain intact, such as Fury or Sadness. Because no Battle Results are shown even after winning all battles, the player volition non earn Experience Points or Ability Points, and the enemies killed in Battle Square exercise not count toward learning new Limit Breaks.
Considering the player'southward condition returns to the moment they were in earlier entering the Battle Foursquare battles, the role player cannot learn Enemy Skills from the monsters there; even if it appears the skill was learned, it volition be gone from the Materia when the histrion is returned to the field. Whatsoever used items, however, volition be lost from the player's inventory, and the histrion is notwithstanding able to morph opponents into items and steal from them.
Enemies [ ]
Battle background.
The monsters in the Battle Square change depending on the point in the game the histrion is at. There are two "pools" of enemies from which the encounters are drawn at random, and the chance of ending with Group A or Group B is equal. Many types of enemies are found in either pool, and the enemies in the final rounds are e'er the same in both Group A and Group B. Some of the enemies encountered in the Battle Square are very rare and unsafe, including the Stilva, Malboro, Blueish Dragon, Ghost Transport, and the Serpent.
Loonshit enemies accept twice as many hit points as they normally exercise, and their Assail and Magic Assault receive a 25% heave, making them stronger than regular encounters.
Ii enemies, the Ho-chu and Tonberry, are fought exclusively in the Battle Square. Both enemies were originally intended to be fought elsewhere, however, the formations cannot be fought past ordinary ways in the final game. Ho-chu was planned to be an inescapable run into in the Aboriginal Wood, and Tonberry an encounter in the Whirlwind Maze. Its counterpart, the Chief Tonberry, can still exist institute within the final dungeon areas of the Northern Cavern.
Until Tiny Bronco becomes available [ ]
Available immediately after getting the buggy.
| Boxing | Group A | Group B |
|---|---|---|
| 1st Battle | 305: 2x Mono Drive 310: 2x Grunt 313: 3x Grunt 325: 1x Guard Hound | 326: 2x Guard Hound 327: 1x Grashtrike 331: 2x Chuse Tank 333: 3x Grashtrike |
| 2nd Battle | 360: 3x Blugu 369: 2x Hedgehog Pie 376: 2x Whole Eater 389: 2x Sahagin, 1x Ceasar | 368: 3x Hedgehog Pie 377: 1x Whole Eater, 2x Hedgehog Pie[notation 1] 388: 3x Ceasar 395: 1x Sweeper |
| 3rd Battle | 396: 2x Cripshay, 1x Deenglow 398: 3x Ghost 399: 2x Ghost, 1x Deenglow 400: 1x Eligor | 397: 2x Deenglow 401: 3x Deenglow 404: 2x Aero Combatant 411: 1x Eligor |
| 4th Boxing | 427: 2x Sword Dance 436: 1x Moth Slasher 444: 2x Encephalon Pod 449: 1x Vargid Police, 1x Zenene | 425: 1x Sword Trip the light fantastic 428: 3x Sword Trip the light fantastic 438: 2x Moth Slasher 445: 1x Brain Pod |
| 5th Battle | 032: 1x Devil Ride 044: 3x Kalm Fang 049: 3x Levrikon 053: 2x Elfadunk | 033: 2x Custom Sweeper 048: 1x Levrikon, 2x Mu 054: 1x Levrikon, 2x Elfadunk 059: 2x Levrikon |
| 6th Boxing | 472: 2x Madouge 436: 3x Castanets 444: 3x Crawler, 1x Ark Dragon 449: 5x Crawler | 473: 2x Madouge, 3x Crawler 477: 4x Castanets 478: 2x Castanets, 1x Ark Dragon, 1x Crawler 484: 4x Scrutin Eye |
| 7th Battle | 064: 2x Nerosuferoth 066: 1x Zemzelett 075: 5x Capparwire 093: 4x Beachplug[note 2] | 065: 2x Nerosuferoth, 1x Formula 071: 2x Formula 072: 1x Zemzelett 083: 1x Nerosuferoth, 2x Capparwire |
| 8th Battle | 070: 1x Hell Rider VR2 085: 1x Grangalan[note 3] 479: 2x Bagnadrana 102: 1x Harpy | 070: 1x Hell Passenger VR2 085: 1x Grangalan[note four] 479: 2x Bagnadrana 102: 1x Harpy |
When Tiny Bronco is bachelor [ ]
Available before passing beyond the third atmospheric wall in the Whirlwind Maze.
| Boxing | Grouping A | Group B |
|---|---|---|
| 1st Battle | 525: 1x Bullmotor 526: 2x Bullmotor 095: 2x Spencer 107: 4x Flapbeat[note 5] | 100: 2x Joker 117: 1x Flapbeat 118: 2x Flapbeat 119: 3x Spencer, 1x Flapbeat* (Covered by Spencer A) |
| 2nd Battle | 108: 1x Grand Horn 109: 2x Gagighandi 110: 2x M Horn 136: 1x Crown Lance | 113: 3x Gagighandi 114: 2x Gagighandi 492: 3x Needle Osculation 494: 1x Needle Buss, 1x Search Crown, 1x Bagnadrana |
| tertiary Battle | 528: 1x Kimara Bug 534: 1x Flower Prong 538: 1x Heavy Tank 115: 1x Gagighandi, 2x Touch Me | 529: 1x Impact Me 530: 2x Kimara Issues 532: 1x Blossom Prong 536: 1x Heavy Tank |
| 4th Boxing | 120: 3x Bagrisk 125: 1x Griffin 126: 1x Golem 129: 2x Desert Sahagin | 121: 1x Griffin 122: 2x Desert Sahagin 127: 2x Skeeskee, 1x Griffin 134: 2x Crown Lance |
| 5th Battle | 124: 3x Skeeskee 540: 4x Heg 543: 3x Sneaky Step 553: 2x Gi Spector | 542: 2x Heg, 1x Sneaky Pace 545: 5x Heg 548: 1x Sneaky Pace, 3x Heg* (Heg B is covered by Sneaky Footstep) 554: 3x Gi Spector |
| sixth Battle | 144: 2x Bahba Velamyu 146: 6x Bombardment Cap[annotation 6] 148: 3x Nibel Wolf 150: 2x Nibel Wolf, 1x Velcher Task | 145: 4x Bombardment Cap, 1x Valron* (Covered by Bombardment Cap B, Battery Cap C) 149: 2x Velcher Job 155: 3x Valron 144: 2x Bahba Velamyu[note vii] |
| 7th Battle | 569: 4x Blackness Bat 582: 1x Sonic Speed, 2x Kyuvilduns 589: 3x Twin Brain 592: 2x Screamer[notation 8], 1x Twin Brain | 568: 3x Black Bat 581: 3x Kyuvilduns 584: 3x Sonic Speed 596: 5x Kyuvilduns[note 9] |
| 8th Battle | 558: 1x Ghirofelgo 573: 1x Ying, 1x Yang 591: 1x Zuu 599: 1x Dragon | 558: 1x Ghirofelgo 573: 1x Ying, 1x Yang 591: 1x Zuu 599: 1x Dragon |
Afterwards acquiring Highwind [ ]
Available after Cloud is dorsum from Mideel, when the Gold Saucer reopens.
| Battle | Grouping A | Group B |
|---|---|---|
| 1st Battle | 604: 3x Razor Weed 606: 2x Jayjujayme, 1x Baroque Bug 609: 2x Foulander 610: 3x Foulander | 613: 2x Garuda 614: 2x Jayjujayme, 1x Garuda 617: 3x Garuda 182: 2x Dual Horn |
| 2nd Battle | 179: 1x Adamantaimai 185: 2x Under Lizard 186: 1x Tonadu 190: 2x Kelzmelzer | 177: 2x Bizarre Problems, 1x Tail Vault 180: 1x Under Lizard 187: 1x Tonadu 189: 5x Slaps |
| third Battle | 641: 1x Doorbull 642: 3x Aboriginal Dragon 647: 3x Toxic Frog, 1x Jemnezmy 650: 2x viii eye | 636: 1x Doorbull 640: 2x Ancient Dragon 645: 2x Toxic Frog, 1x Jemnezmy 651: 2x 8 eye |
| 4h Battle | 192: 1x Vlakorados 194: 2x Trickplay 656: 1x Boundfat, 3x Malldancer 668: 1x Acrophies | 661: 1x Trickplay, 2x Boundfat 201: 2x Jumping 209: 2x Ice Golem 212: 1x Hippogriff |
| 5th Boxing | 672: 3x Shred 692: 2x Lessaloploth 696: 1x Magnade 210: 3x Jumping | 673: 2x Frozen Smash 674: 2x Shred, 1x Frozen Nail 680: 1x Lessaloploth 694: 1x Snow, 1x Lessaloploth |
| sixth Battle | 705: 1x Stilva 713: 1x Cuahl, 2x Headbomber 727: 2x Gremlin, 1x Sculpture 732: 1x Ironite, 2x Air current Wing | 700: 3x Headbomber 706: 2x Headbomber, 1x Zolokalter 711: 3x Evilhead 712: 2x Cuahl |
| 7th Battle | 701: 1x Malboro 714: 1x Blue Dragon 721: 1x Gigas 731: 1x Dragon Passenger | 724: 3x Gremlin 730: 2x Wind Wing 733: 2x Ironite 956: 1x Tonberry |
| 8th Boxing | 804: 1x Serpent 227: 1x Sea Worm 795: 1x Ho-chu 765: 1x Ghost Ship | 804: 1x Ophidian 227: 1x Body of water Worm 795: 1x Ho-chu 765: 1x Ghost Ship |
Battle Points and prizes [ ]
The player always starts with 10 points and goes on to win more Boxing Points for the 2nd and successive matches, i.east. every time they take a handicap. The handicap determines the amount of points awarded, worse handicaps giving improve BP, simply this is only noticeable for the final rounds. If the player wins all matches, or if they choose to quit between battles, they get to take abroad the BP they had accumulated; no points are awarded if the player is killed or petrified in battle. BP are awarded even if the histrion uses Escape magic or Smoke Bombs, simply not if the player uses the Escape battle menu control. The maximum BP i can obtain in one run is 12,586. After various runs the player can accrue a maximum of 65,000 BP, in which if it get more BP these will be lost.
The Battle Points tin can be redeemed for items at the terminals, but if at any time the player leaves the Battle Square, their Battle Points reset to zero. Prizes may be purchased multiple times, with the exception of the Omnislash manual and the Westward-Summon Materia, which can exist purchased only once.
Prizes [ ]
| Prize | Before Tiny Bronco | After Tiny Bronco | Afterwards Highwind |
|---|---|---|---|
| Potion | fourscore | N/A | North/A |
| Phoenix Down | 160 | 100 | N/A |
| Shrapnel | 320 | N/A | N/A |
| Ether | 640 | North/A | N/A |
| Remedy | Northward/A | 200 | 100 |
| Memmet Greens[annotation 10] | 1280 | 400 | N/A |
| Fury Ring | 2560 | N/A | N/A |
| Enemy lure[note 11] | 5120 | 800 | 250 |
| Bird Wing | N/A | 1600 | North/A |
| S-Mine[note 12] | Due north/A | 3200 | N/A |
| Correct Arm[annotation 13] | N/A | North/A | 500 |
| Pre-Emptive | 10240 | 6400 | 1000 |
| Regan Greens[note xiv] | N/A | Northward/A | 2000 |
| Speed Plus | 20480 | 12800 | 4000 |
| Stardust | N/A | N/A | 8000 |
| Championship Belt[annotation 15] | 40960 | 25600 | 16000 |
| Omnislash[notation 16] | Northward/A | 51200 | 32000 |
| W-Summon[notation 16] | N/A | North/A | 64000 |
Handicaps [ ]
After each battle, the thespian must spin a slot reel; depending on what they stop the reel on, they receive a sure handicap. Some handicaps can exist avoided, or their effects minimized, with equipment. The player receives more than BP the worse handicaps they go, and the afterwards the circular they accept fought to—if they receive the "All Materia is cleaved" handicap on the eighth fight, they volition win over 10,000 BP. So while taking larger handicaps on purpose is risky, it tin can be rewarding.
The thespian can dull the reels slightly by borer ![]() or switch. Another trick is to concord
or switch. Another trick is to concord ![]() or switch, which would stop spinning the reel; however, information technology also hides the graphics of the reel. The player will desire to stop the reel at the handicap earlier the one they desire shows up. One time the reel is stopped, ane must quickly allow go of
or switch, which would stop spinning the reel; however, information technology also hides the graphics of the reel. The player will desire to stop the reel at the handicap earlier the one they desire shows up. One time the reel is stopped, ane must quickly allow go of ![]() or switch and tap
or switch and tap ![]() or ok. With some practice on the timing, the player should be able to finish the reel at the desired handicap.
or ok. With some practice on the timing, the player should be able to finish the reel at the desired handicap.
The first reel determines the results on all subsequent reels, as getting a reel with only ane handicap will crusade all subsequent reels to gyre only ane handicap also, with a dissimilar handicap each time up until around match 6. If the actor gets this unfortunate pattern, the reels volition never spin a handicap the player would be immune to. The histrion may also go a pattern where they find a positive "handicap" in every reel. Some other common design is for the reels to contain a specific handicap once on each reel, normally a status. This may still occur when the player has an immunity to that status, and then the player tin potentially get the aforementioned result for every reel and accept no outcome; however, the status handicaps do not offering significant BP.
The seventh and 8th matches earn much more BP than the earlier rounds; the amount awarded for taking handicaps is multiplied by successively college numbers equally the matches progress, with the last two being markedly higher.
Numbers marked in italics announce that the handicap cannot be earned in that round in normal gameplay.
| Handicap | Symbol | Effect | Battle Points, at round | |||||||
|---|---|---|---|---|---|---|---|---|---|---|
| 2 | 3 | 4 | 5 | 6 | 7 | 8 | ||||
| Magic Materia is broken |  | The actor is no longer able to utilise Magic Materia. Whatever stat changes caused past equipped Magic Materia are negated. | fifteen | 28 | 58 | 145 | 445 | 1755 | 9425 | |
| Summon Materia is cleaved |  | The player is no longer able to use Summon Materia. Any stat changes caused past equipped Summon Materia are negated. | 10 | xviii | 37 | 90 | 276 | 1127 | 6527 | |
| Support Materia is broken |  | The player's Support Materia breaks. Whatever stat changes caused by equipped Support Materia are negated. | 10 | 18 | 37 | 91 | 281 | 1159 | 6808 | |
| Contained Materia is cleaved |  | The player'southward Independent Materia breaks. Whatever stat changes caused past equipped Independent Materia are negated. | 11 | 20 | xl | 99 | 301 | 1196 | 6645 | |
| Command Materia is broken |  | The thespian is no longer able to use Command Materia. Any stat changes caused by equipped Control Materia are negated. | v | 8 | 17 | 41 | 132 | 633 | 4983 | |
| All Materia is cleaved |  | All of the player's Materia breaks. Any stat changes caused by equipped Materia are negated. | 15 | 28 | 59 | 149 | 463 | 1866 | 10000 | |
| Accompaniment is broken |  | The role player's accessory breaks, negating whatever effects it had. | 10 | 18 | 35 | 84 | 248 | 953 | 5083 | |
| Particular control is sealed |  | The player tin can no longer use items. | xiii | 23 | 48 | 118 | 355 | 1368 | 7201 | |
| Armor is broken |  | The actor'due south defenses decrease. Whatever elemental resistance acquired past the armor is negated. The player is still able to use any Materia equipped on their armor. The effect is cumulative. | 10 | 17 | 33 | 73 | 194 | 654 | 2903 | |
| Weapon is broken |  | The actor'due south set on ability sharply decreases. The player is yet able to use any Materia equipped on their weapon. The outcome is cumulative. | 15 | 27 | 57 | 140 | 419 | 1602 | 8246 | |
| i/2 speed |  | Character's speed is halved; differs from Boring. The upshot is cumulative. | 5 | seven | eleven | 19 | 35 | 77 | 202 | |
| Minimum |  | Inflicts Modest on the player. | 5 | 8 | 16 | 36 | 108 | 453 | 2940 | |
| Poison |  | Inflicts Poison on the player. | iv | 6 | 9 | xvi | 33 | 82 | 257 | |
| Toad |  | Inflicts Frog on the histrion. | 6 | 10 | nineteen | 44 | 130 | 520 | 3069 | |
| Time x30 damage |  | The thespian receives damage equivalent to how long they have been fighting - the longer they have been fighting, the more than impairment they take. The total game time (hours) * thirty is the damage done. If the calculated damage is greater than the graphic symbol's electric current HP then their current HP will be reduced to 1. | nine | fifteen | 26 | 54 | 130 | 379 | 1401 | |
| Downward v levels |  | The player'south level decreases by v, reducing principally player'southward physical and magical harm dealt to enemies. | 5 | 8 | 13 | 25 | 58 | 166 | 627 | |
| Down x levels |  | The histrion's level decreases past x, reducing principally histrion's physical and magical harm dealt to enemies. | 10 | 16 | 28 | 53 | 118 | 308 | 968 | |
| 1/two HP |  | The histrion's max HP is halved (calculations based on current[notation 17] actual[note 18] max value). Does not affect their current HP, unless their current HP is higher than half of their max HP. The minimum HP is capped at x [annotation 19]. | 13 | 22 | 40 | 84 | 204 | 591 | 2119 | |
| 1/2 MP |  | The player's max MP is halved (calculations based on current[note xx] actual[note 21] max value). Does non affect their current MP, unless their current MP is higher than half of their max MP. The minimum MP is capped at 10 [note 22]. | 12 | 20 | 36 | 73 | 173 | 485 | 1669 | |
| one/2 HP&MP |  | The role player receives the to a higher place two handicaps. | 13 | 22 | 43 | 94 | 244 | 775 | 3134 | |
| Zero MP |  | The role player's MP is reduced to zero. MP may still be recovered with items. | 11 | 19 | 33 | lxx | 171 | 502 | 1855 | |
| Yesss! No handicapp! |  | The player receives no handicap. | seven | 7 | 7 | 7 | seven | vii | 7 | |
| HP restored |  | The player's HP is restored equal to a one-half of the histrion's maximum HP. | ane | i | 1 | 1 | 1 | ane | ane | |
[1]
Strategy [ ]
It is recommended the player comes equipped with their character's strongest weapon and a powerful armor, and a Ribbon, if available. The Ribbon prevents status ailments, giving the thespian a handful of "safe" handicaps, as Small, Frog, and Toxicant will non affect them if they come up on the reel. The player can also pair an Added Outcome Materia with a Hades Materia to protect against many status furnishings. The status result Resist doesn't protect against statuses gained from the handicap reels, which tin can lead to a serious handicap, as one time applied, the Resist status volition prevent the thespian from removing the status with normal Esuna spells and healing items.
The actor can make use of an Enemy Skill Materia with Big Guard (for Haste, Bulwark and MBarrier), Magic Hammer (for replenishing MP) and Dragon Forcefulness (for boosted defense force) learned. HP Plus, MP Plus and Luck Plus (for higher critical hit chance) Materia are likewise useful, as is a high-leveled Restore Materia. If the actor'south Materia breaks, or they lose all their MP due to a handicap, they should take several useful items to compensate. In endgame Elixirs and X-Potions tin be easily obtained through the W-Particular duplication bug, or stolen/dropped from enemies in the Northern Cave.
For a more than physical-ambitious strategy, the use of Double Cut or Slash-All is recommended. If Slash-All is upgraded to Flash, the thespian tin can instantly dispatch about enemies in a single turn.
It is also useful to identify the fighter in the back row to have less impairment and use the Long Range Materia (or a character with a long range weapon). Equipping counterattack Materia and Sneak Assail lets the player perform more turns, and equipping multiple counterattack Materia at once also stacks.
The battles won't reward the player with EXP, AP or particular drops, and so it is good to prioritize defence against the number of Materia slots when choosing armor; e.chiliad. the Gigas Armlet (stolen from Gigas), Adaman Bangle (stolen from Adamantaimai), or even Ziedrich (stolen from Turks:Rude) are proficient for Battle Square considering of high defense, despite having few Materia slots. One of the best possible armor to employ is the Mystile (plant in Midgar during the Function 2 visit, and in the Northern Cave), as its defence force and magic defense evade rates are loftier.
Nearly status effects, both positive and negative, acquit on to sequent battles, so if the actor casts Haste or Large Baby-sit in the starting time battle, Haste will acquit through the entire match. Regen is a useful fashion to proceed HP upwardly without having to repeatedly heal. Expiry-sentence does not carry through to subsequent battles (even though fellow countdown condition Slow-numb does).
If the player comes up against a Tonberry, i can easily become invulnerable past casting Death Strength from the Enemy Skill Materia, which makes Tonberry'due south instant death move miss.
If the player ends up breaking their weapon, they tin can use Goblin Punch from the Enemy Skill Materia to bypass the effect, although it volition do simply 75% of the normal attack (even so, it can deal critical hits), and the player must be wary of not getting the All Suspension handicap, at least non in the early stages.
Since the handicap timing that earns the almost BP is at the seventh and 8th matches, and the handicap types that earn the most BP are "Magic Materia Breaks" and "All Materia Breaks", the highest BP combination cannot be won with Escape magic, but Smoke Flop items.
If the All Lucky 7s outcome activates on the Battle Square, the histrion enters the next battle with 7,777 HP after dispatching the enemies, but without the All Lucky 7s upshot. A unmarried command will reactivate it.
A sensible strategy to existence successful in the Gilded Saucer is to go in with a full LIMIT gauge and the Mime control. The player tin mimic their Limit Interruption through every round so long as the Control Materia does non break and a counter is non ready-upwardly.
Another constructive method of completing the Boxing Square is to equip the following Materia and combinations: Magic Counter linked with Odin. Since enemies can attack outset so often, the Magic Counter-Odin combination allows the player to eliminate entire rounds of enemies without taking an activeness. Odin could too be linked to Sneak Assail. The Contained Counter Attack Materia as well as the Support Counter Materia can besides be used for great effect.
Later obtaining the Highwind in Part 2, in that location is a quarter gamble of facing the Ghost Ship enemy in the final circular, who can employ the Goannai ability to eject the player from battle. Using L4 Suicide, or throwing healing items at it, can easily acceleration the Ghost Ship. Morphing the Ghost Ship nets a unique item the player tin can give to the Kalm traveler.
Special match [ ]
If the player has bought Omnislash and W-Summon, had Cloud learn Omnislash, and they have acquired Cloud's Ultima Weapon, they tin can enter a special lucifer only Cloud can participate in. The receptionist comments Cloud is probably strong plenty to take on the top fighters, and asks if he would like to participate in a individual battle. The special match is harder than the normal battles, and the prize is the Concluding Set on Materia that tin exist won in one case. The player must non utilise Smoke Bomb in the last battle of the round against Proud Clod; this volition internet all the BPs equally expected, but will not earn the Concluding Assault Materia. The role player must eliminate all eight enemies.
If the player participates and wins multiple special battles, they will win worthless trophy items, such as Dio's autograph. After winning the special battles ten times the prize will be a Ribbon, simply there are easier means to obtain 1 at this point.
The prizes change depending on the number of times won:
| Win count | Reward |
|---|---|
| 1 | Final Set on Materia |
| 2 | Autograph |
| iii | Gainsay Diary |
| 4 | Gambler |
| 10 | Ribbon |
If the actor'south Materia inventory is full on the first win, the player will receive no prize, and will never exist able to obtain the Final Attack Materia.
In all other times won, the actor will a receive a random prize at the following rates:
| Rate | Reward |
|---|---|
| 86/256 | Shorthand |
| 86/256 | Combat Diary |
| 84/256 | Gambler |
The enemy line-upwardly is as follows:
| Battle | Enemy |
|---|---|
| 1 | 960: Sea Worm |
| two | 961: Ho-chu |
| iii | 962: Unknown iii |
| iv | 964: Ophidian |
| 5 | 965: Wolfmeister |
| half dozen | 968: Behemoth |
| vii | 972: Maximum Kimaira |
| 8 | 973: Proud Clod, Jamar Armor |
Other appearances [ ]
Concluding Fantasy VII demo [ ]
The Battle Square has appeared in a demo version of the PC port of Terminal Fantasy VII. The actor must boxing monsters equally Cloud to win. The enemies fought on the rounds is an array of the same enemies that are fought in the total game subsequently obtaining Highwind.
Concluding Fantasy Record Keeper [ ]
The Battle Square was the focal betoken for the Challenge Event The Battle Loonshit.
![]() This section near a location in Final Fantasy Record Keeper is empty or needs to be expanded. You tin assist the Final Fantasy Wiki by expanding it.
This section near a location in Final Fantasy Record Keeper is empty or needs to be expanded. You tin assist the Final Fantasy Wiki by expanding it.
Musical themes [ ]
"Aureate Saucer"
![]()
Like in the rest of the Golden Saucer, the eponymous theme "Gold Saucer" (ゴールドソーサー, Gōrudo Sōsā ?) plays in the Battle Foursquare. Nevertheless, during the battles, "Hurry Up!" (もっと急げ!, Motto Isoge! ?) is played.
Backside the scenes [ ]
Off grade!
A ordinarily referred to mistranslation is used in the Battle Square: when the player is prompted whether or not they want to continue, they are given the options "Off grade!" and "No, manner!". This was corrected for the PC version to "Of course!" and "No way!".
The alleviation prize "Tissue" has no value. The only conceivable purpose is to continue rail of how many times i has participated in the battle arena. Tissues awarded equally a "prize" may be a reference to advertising strategies in Japan (as well as Red china and Taiwan), equally locals consider information technology crass to paw out ads, so they advertise past handing out items of marginal value instead. The artwork for the Tissue for Concluding Fantasy VII has an advertisement of the Love Bee Inn on it.
"D Type Equipment", a piece in Dio'due south museum, refers to an episode of Neon Genesis Evangelion where Asuka Langley Sohryu fights an angel in magma and her armor is type D.
Gallery [ ]
")
Battle Foursquare in Earlier Crunch -Final Fantasy VII-.
")
Battle Square in Before Crisis -Terminal Fantasy Vii-.
Notes [ ]
- ↑ Hedgehog Pie B is covered by Hedgehog Pie A
- ↑ Beachplug D is covered past Beachplug B
- ↑ Grangalan Jr. is covered by Grangalan Jr.Jr. A; Grangalan is covered past Grangalan Jr.Jr. A, Grangalan Jr.
- ↑ Grangalan Jr. is covered by Grangalan Jr.Jr. A; Grangalan is covered by Grangalan Jr.Jr. A, Grangalan Jr.
- ↑ Flapbeat B is covered by Flapbeat A; Flapbeat C is covered by Flapbeat D
- ↑ Battery Cap B, C is covered by Battery Cap A; Bombardment Cap D is covered by Battery Cap B; Bombardment Cap E is covered by Bombardment Cap A, B, C; and Battery Cap F is covered past Battery Cap C
- ↑ The 7th and 8th battles are chosen from the Group A pool if this battle comes up
- ↑ Screamer B is covered past Screamer A
- ↑ Kyuvilduns D is covered past Kyuvilduns B; Kyuvilduns Eastward is covered by Kyuvilduns B, Kyuvilduns C
- ↑ [sic], known as "Mimett Greens" in the menu.
- ↑ [sic], known equally "Enemy Lure" in the card.
- ↑ [sic], known as "S-mine" in the menu
- ↑ [sic], known every bit "Right arm" in the carte du jour
- ↑ [sic], known as Reagan Greens in the bill of fare
- ↑ [sic], known every bit Champion Chugalug in the menu
- ↑ xvi.0 16.1 Just i
- ↑ Consequence tin can be stacked by multiplication if picked more than than in one case (1/4 of original for twice, ane/8 for thrice, and then on).
- ↑ Limitation of ix,999 HP is applied after the reduction. Halved max HP may exceed 4,999.
- ↑ if the histrion had less than 10 HP this handicap has not issue)
- ↑ Issue tin be stacked by multiplication if picked more than once (ane/iv of original for twice, 1/8 for thrice, then on).
- ↑ Limitation of 999 MP is applied later on the reduction. Halved max MP may exceed 499.
- ↑ if the role player had less than 10 MP this handicap has not effect
References [ ]
- ↑ Final Fantasy VII Kaitai Shinsho The Complete, p.208
Source: https://finalfantasy.fandom.com/wiki/Battle_Square
0 Response to "When Is Gold Saucer Open Again"
Publicar un comentario